

Wednesday, January 14, 2015
Dalla Vita Succulent Arangements- Sunset Magazine Feature
I shot these succulent bridal bouquets a few months back for my friends at Dalla Vita- a succulent design company based in Santa Barbara. If you live in the area, make sure to check out their site for all your succulent needs-they have the most beautiful arrangements! They even offer same day delivery. And if you get the chance to flip through the January 2015 issue of Sunset Magazine, make sure to turn to page 12!
Wednesday, June 25, 2014
DIY Dip-Dye Indigo Napkins

I recently photographed this summer DIY project for Joya of Joya Rose and Katherine of The Habitat Factory. They were a blast to work with and I even came home with my own set of napkins which I have loved using for fancy little picnics at the park. Don't you just love summer?!

To make the napkins you will need:
- High quality 100% linen fabric (2 yards will make 6 napkins)
- Scissors
- A tape measure
- An iron
- A sewing machine
- Scissors
- A tape measure
- An iron
- A sewing machine
As an alternative to sewing your own, I recommend these exquisite napkins handmade by Gitana of Daiktuteka.
For the dye:
- A galvanized* 5-gallon tub (or two smaller tubs)
- Chemical safe gloves
- An indigo dye kit (like this one)
- A clothes line & clothes pins
- Chemical safe gloves
- An indigo dye kit (like this one)
- A clothes line & clothes pins
*You can also use plastic, stainless steel, or containers made from other materials so long as they will not be used for preparing food and you are okay with getting them a bit stained.
Wash your fabric before you start. This way you don’t have to worry about shrinkage and the fabric is cleansed of any chemicals so it can take the dye better.
Once its washed and dried, measure and cut out six 18” squares of linen. Depending on how wrinkled your fabric is, you may want to iron it first.

Then iron a half-inch hem around the edges of your napkins (they will end up being 17” square). Linen requires high heat on the iron, so crank it up. I used the mister on my iron to get the fabric a bit damp so the creases would be nice and crisp. Now you’re ready to sew your hems!

You want to sew as close to the cut-edge of the hem as possible (away from the edge of the napkin). I also recommend using the same color thread as your fabric, so as to be as forgiving as possible with wobbly lines (it’s part of the charm!) Keep your napkins flat after they’re sewn so as to not wrinkle them before dyeing.

To make the dye, follow the instructions in your kit. I strongly recommend doing this part of the project outside. Indigo is a powerful dye, and will stain porous surfaces. If you used the dye kit we did (this one), just use 4 gallons of warm tap water and stir in the indigo powder, soda ash, and thiourea dioxide. I separated these into two 3-gallon tubs, which was plenty. If you’re just dying six napkins, you’ll only need one container, so you may want to halve the dye recipe and save the rest for another time. The mixed dye will last a day or so but not much longer.
The dye will immediately turn green - and should end up looking something close to yellow gatorade with a blueish purple film on top:

Let the dye sit covered for 10-20 minutes or so, and then remove as much of the film and bubbles from the surface as you can.
Before you start dyeing, fold a napkin the way you’ll fold it for your table. Decide how you want your napkin to look in that state, and then deconstruct the fold so you know how you want to dye the napkin as a whole. I went for a very simple half-blue half-white look for my folded napkin, which meant only about a quarter of my unfolded napkin needed to be dyed.
Dip your napkin in clean tap water and then dip it in the dye. You’ll only need to hold it in there long enough for the dye to permeate the fabric - holding it in for longer won’t yield a stronger color. Getting the napkin wet before the dip will help you maintain straight lines and make the seam from white to blue much smoother. If you’re going for something more uneven, the water dip is not necessary.
Dip your napkin in clean tap water and then dip it in the dye. You’ll only need to hold it in there long enough for the dye to permeate the fabric - holding it in for longer won’t yield a stronger color. Getting the napkin wet before the dip will help you maintain straight lines and make the seam from white to blue much smoother. If you’re going for something more uneven, the water dip is not necessary.

The dye will look green when you first take your napkin out of the vat, but will turn blue as it oxygenates (which is really fun to watch!) To gain deeper indigo hues, hang your napkin to dry after each dip until it is completely oxygenated (5-10 minutes), then dip again.
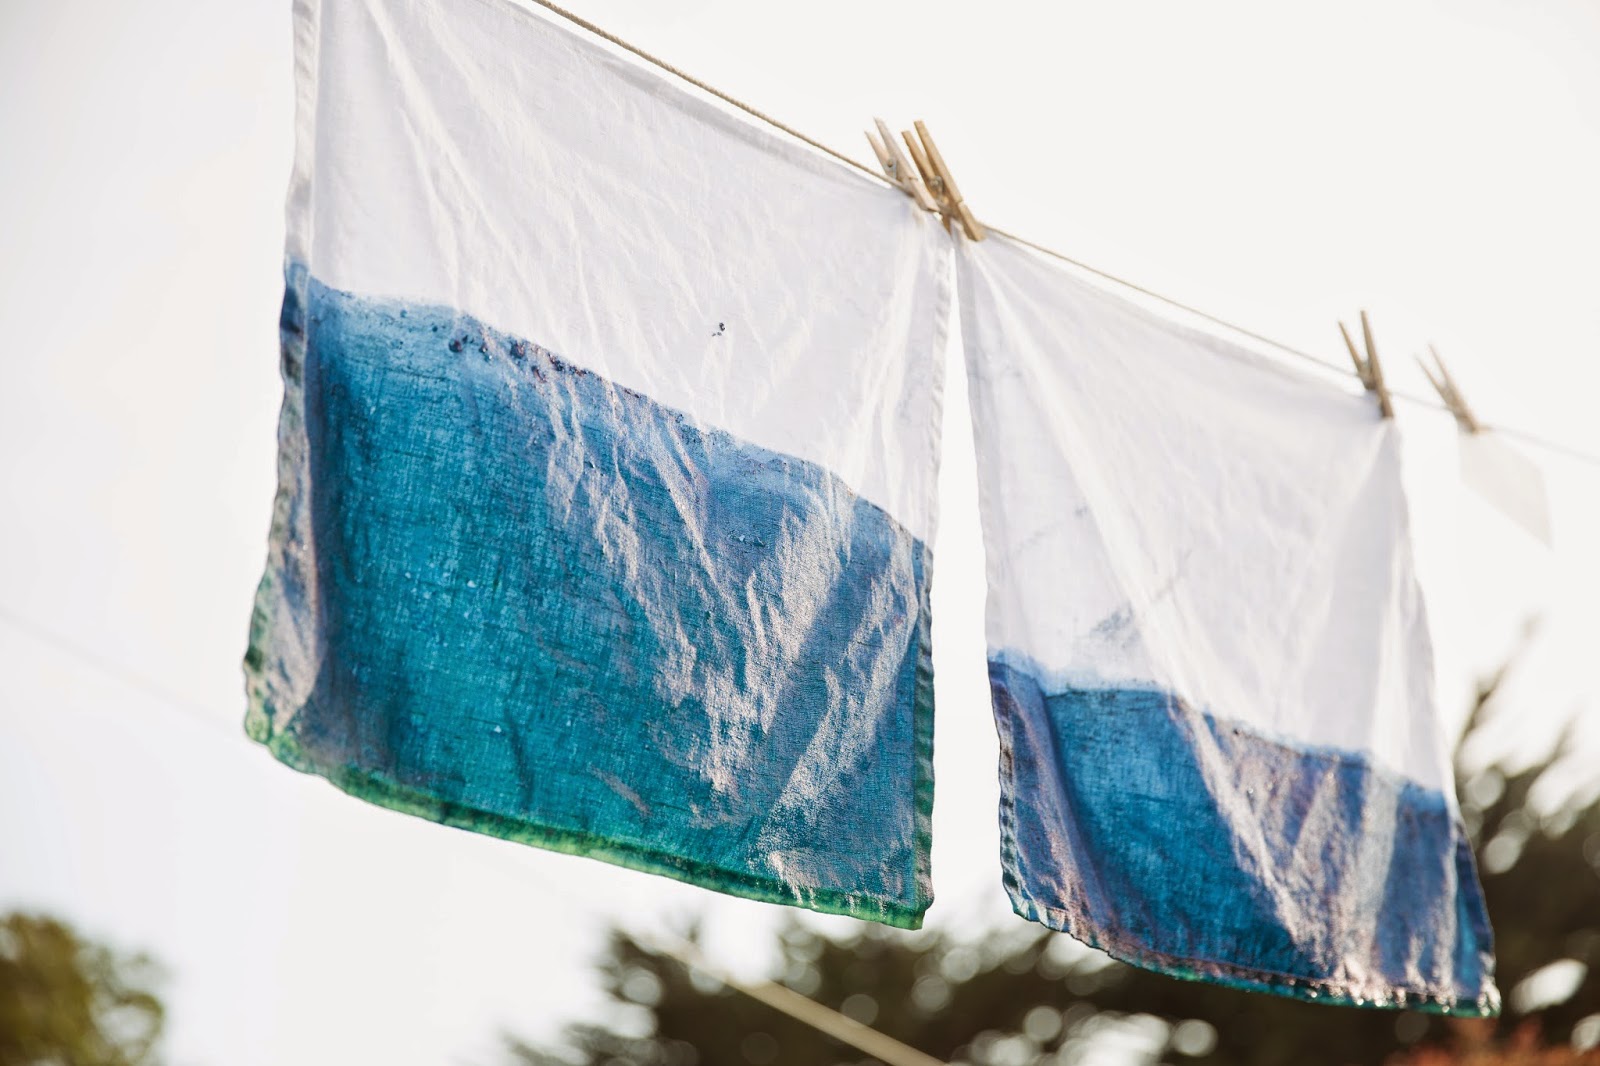
When your napkins are done, wait until they are dry and then rinse them with the hose while they hang on the line to remove any residual indigo powder. Machine wash them alone - all of your dyed pieces can go in together, but no other fabric - with warm water and mild detergent. Tumble or hang them dry. Then dress your summer table in indigo!
Dip-dye can be used to create infinite patterns and designs - be creative! Let each member of the family dye his or her own napkin, or make a personalized pattern and give the napkins as a wedding gift. You can share your designs with us with the hashtag #indigosummer - we want to see your creations!
Monday, March 31, 2014
gourmandise bakery - salt lake city, ut
Last weekend I shot some images for Gourmandise in Salt Lake City. Here are some of my favorites.
PS. I will be finishing up my very first cookbook in the next few weeks. I have been working on this project since last summer and I am really excited to finally share it. Once its done I will be putting more energy back into the blog, so expect things to pick up very soon!


Wednesday, November 27, 2013
The Summer of Dreams Part I: Belgium and the Netherlands
Well now that its Thanksgiving, I decided that its probably a good time to start posting pictures from last summer. Maybe when I graduate I will have a little more time to blog.
Part I
Belgium
I had the best time with my BFF Hanna exploring her new turf in Belgium! (HUGE thank you for letting me come visit!) For those who don't know what Belgium is like, all you need to know is that there are a LOT of castles. There are also lots of cows, chocolate, and waffles. And with a few exceptions, there were hardly ever any tourists.
 |
| Kasteel Gaasbeek |
 |
| the grounds at Kasteel Gaasbeek |
 |
| Chateau D'Havre |
 |
| Chateau de Beloeil |
 |
| Bruges was my favorite |
 |
 |
 |
| just outside Bruges |
 |
| Ghent |
 |
 |
 |
The Netherlands
We took a day trip up to Amsterdam to go to the Anne Frank house. They didn't let us take any pictures inside but I would definitely recommend it!
Here are some of the other things we did that day:
 |
| We had breakfast at a cute bakery called De Bakkserswinkel |
 |
 |
| We went to the Van Gogh museum. |
 |
| We went to the Tulip Museum. Well, the gift shop at least. |
 |
| We walked along the canals. I loved those fluffy purple flowers. |
 |
| We also went to the I amsterdam sign. This is like the only picture I could find of the two of us together. Hooray for cell phone cameras! |
Next stop: London!
Monday, September 2, 2013
back to real life
I have had the most amazing summer ever. I am so blessed.
But now I am home and ready to knock out my last year of college! Let's do this!
But now I am home and ready to knock out my last year of college! Let's do this!
Saturday, July 13, 2013
happy accident


I was going through the pictures I took in London and came across this one from Queen Mary's rose garden..Some how I ended up taking a photograph that looks just like my favorite painting in the entire world. Imagine that!
Nonstop traveling has been keeping me busy but I will try to get some fun stuff posted soon.
xo Heather
Monday, June 17, 2013
Salted Caramel Cupcakes
My little sister graduated from High School this week! Congrats Chelsea, I am so proud of you!

As part of the celebration, we had a family dinner and surprised Chelsea with all of her favorite foods. My mom found a recipe for salted caramel cupcakes and asked me to make them. You should have seen Chelsea's face when she found out! She was so excited! They turned out really yummy so I wanted to share the recipe, although I apologize that I have no idea where it came from.


Salted Caramel Cupcakes
Step 1: Prepare the caramel
ingredients:
2 cups sugar
1 tablespoon water
12 tablespoons unsalted butter, at room temperature
1 teaspoon pure vanilla extract
1 cup heavy cream, at room temperature
Pour the sugar and water into a large saucepan. Heat on medium high heat and stir constantly until the sugar completely liquefies. Stir constantly and be careful not to burn the sugar. After all the sugar has dissolved, add the butter and vanilla extract to the saucepan and mix thoroughly. Once the butter has melted and the butter and sugar are completely mixed, remove from heat and, using a whisk, slowly whisk in the heavy cream until you reach a beautiful golden brown caramel color. Set aside and let cool and thicken for 5 minutes at room temperature. Refrigerate for 20 minutes (or longer) to thicken further before using in the cupcake and buttercream recipes and for drizzling on the finished cupcakes.
Step 2: Mix the batter and bake the cupcakes
ingredients:
2 1/2 cups all purpose flour
2 1/2 teaspoons baking powder
1/4 teaspoon salt
8 tablespoons unsalted butter, at room temperature
1 3/4 cups sugar
2 large eggs, at room temperature
2 1/4 teaspoons pure vanilla extract
1 1/4 cups whole milk, at room temperature
1/2 cup caramel (recipe above)
Preheat the oven to 350 degrees F. Line cupcake pan(s) with paper baking cups, or grease with butter if you prefer. Sift together the flour, baking powder, and salt in a small bowl and set aside. Cream together the butter and sugar or 3 to 5 minutes, until light and fluffy. Add the eggs one at a time, mixing slowly after each addition. Add the vanilla extract.
Slowly add one third of the dry ingredients followed by one third of the milk. Mix slowly, and then add another third of the dry ingredients, followed by one third of the milk. Mix slowly until incorporated. Stop to scrape down the bowl as needed. Then, finally, add the last third of the dry ingredients, followed by the last third of milk. Mix slowly until fully incorporated. Add the caramel by hand and mix slowly, swirling it into the batter, but not mixing it in completely. Scoop the batter into the cupcake pan no more than 2/3 full and bake for 18-21 minutes (start checking at 16 minutes). Transfer the pan to a wire rack to cool completely.
Step 3: Make the salted caramel buttercream frosting
ingredients:
3 sticks unsalted butter, at room temperature
6 cups powdered sugar
1 1/2 teaspoons whole milk
1 1/2 teaspoons salt
3/4 cup caramel (above) plus additional for drizzling on top
Add all the ingredients to a large bowl and mix on high speed until light and airy. Once the cupcakes have cooled, frost with buttercream and drizzle caramel on top, then sprinkle with sea salt.

I made a cake topper to match Chelsea's school colors and chose tassels to go with the graduation theme. You can find it in pink on my Etsy shop (here)
Enjoy!
xo Heather
Subscribe to:
Posts (Atom)